Showing posts with label arduino. Show all posts

Friday, October 14, 2011

Quadcopter Tutorial 3: Messing around with code and the Arduino

EDIT: Someone is helping me out with the quadcopter, and recommended the beta code and configurator (AeroQuad_v2.5_Beta1.zip and AeroQuadConfiguratorFull_v3Beta2.zip in the AeroQuad downloads section). The code is edited the same way as in this documentation, but I'm also changing my style from plus configuration to x configuration.

So I've finally decided to be productive and post another tutorial. This one will be better because it's more of a documentation, not just a tutorial. I'm writing and taking pictures of what I'm doing as I'm doing it and not afterwards. The reason I didn't do that before is because I had already done those before deciding to make a tutorial. Also, the Aeroquad tutorial on their wiki might be easier, so go there if I don't explain it clearly enough or if I'm more boring-er than them.

1. Installing the Arduino Software:

First, I'm going to download the software for the Arduino, which can be found here. I chose my operating system, which is Windows. You need to download a zip file. If you don't have a program that can unzip these, I found a good one here. Be careful when installing it and look carefully at every page. Don't let them trick you with sneaky text into installing some crappy useless Bing toolbar. I unzipped the file into a folder called "quadcopter".

2. Downloading the AeroQuad Code:

I went here and downloaded the configurator as well as the code and put them in the same folder as the Arduino software. The links should be the two at the bottom: "AeroQuad_v2.4.2.zip" and "AeroQuadConfigurator_v2.7.1.zip". Simply put, the code tells the quadcopter what to do and the configurator troubleshoots if something doesn't work. My folder now looks like this:

3. Testing the Arduino:

To connect the Arduino, I needed the USB A to B cable, which looks like this:
By the way, I definitely took that picture, and my desk definitely is that blindingly perfect and white. I just opened the Arduino.exe in the folder I unzipped. AeroQuad recommends that I test the Arduino out with the "blink" code first, so I will. Basically, this just blinks an LED on the Arduino every second.
It opens another window with code on it. It looks like Java, but somewhat simpler. I went to the tools tab, then to board, and chose "Uno", because I have the Arduino Uno. The program can't find my Arduino because it can't find the com port. This told me to go to Control Panel>System and Security>System, so I did. I opened the device manager, found the Uno, and browsed for the driver, which was in the folder arduino-0022>drivers. I chose the folder and the drivers were installed. Now on the device manager, this is what I see:
I can finally get back to testing. I chose the now-available com port:
As you can see, uploading now works and I see the LED blinking on for one second, then blinking off for one. Now to the real code.

4. Editing and Uploading the Code:

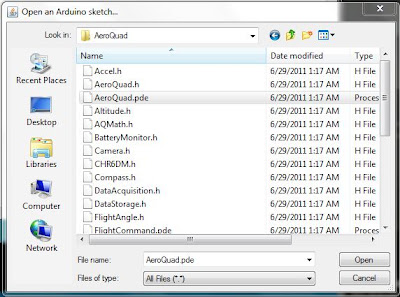
I needed to open the AeroQuad code to start with, so in the Arduino program, I went to File>Open>...>AeroQuad>AeroQuad.pde:
This is extremely simple. Just uncomment whatever you're using (take away the "//"), so I uncommented "#define AeroQuad_v18" since I'm using an Arduino with the AeroQuad 1.9 shield (which is essentially the same as the 1.8).
The flight configuration is how the propellers are arranged relative to the front of the quad. The basic ones are X and +. X is meant for fpv quads, or quads with cameras on them so the propellers aren't blocking its view, but it seems more complex for me, and I'm not using a camera, so I chose the + configuration:
There are three optional sensors: the barometer, magnetometer, and battery monitor. I don't have either of the first two, and I'm not using the battery monitor until I'm already finished, so I uncommented only the last choice:
The next section has to do with flight angle calculations. Basically, you uncomment the ARG line if you don't have a magnetometer and otherwise leave it. I don't have a magnetometer, so I uncommented it:
The remainder of the user-definition section is about camera stabilization and stuff that I don't care about (currently), so I'm done!
I uploaded the code to the Arduino with no problems. If you need any help, comment.

Monday, September 5, 2011

Quadcopter Tutorial 2: AeroQuad 1.9 Shield

So here's the second tutorial. This will be about how to solder the AeroQuad shield together to make the Arduino more user-friendly. I honestly think it might be easier for you to do the tutorial from the AeroQuad wiki here, but I'll be going through things I had trouble with that they might not completely explain.

So to start, this is what the shield will end up looking like in the end. I'll number all the sections so you know what part I'm referring to when.


Before I get started with that, though, I'll talk about soldering. First of all, when you solder, solder outside or somewhere with good ventilation. This is because the solder has lead in it, which you shouldn't inhale. Also, because of this, wash your hands after soldering because you don't want lead going into your mouth when you eat. Solder on a surface that either won't get damaged or you don't mind getting damaged if you accidentally touch it with the soldering iron. The soldering iron gets very hot, so you don't want to touch it either. If your soldering iron is like mine, it comes with a little ring which you can set it on when you're waiting for it to cool down or just want to take a break. This is a picture that shows what that's for, because I didn't know at first:


Since you're doing light soldering, the soldering iron should be 15 watts. If you look in the previous picture, you can see that mine can switch between 15 and 30. Your solder should be .032" in diameter. This is the thinner type meant for things like this.


When you solder, you should have a relaxed grip so that the soldering iron doesn't move around too much. Don't hold your hand in the air, because that's unstable and hard to keep still.


This is extremely easy once you get the hang of it. There are two ways I've found I could do this. One is to heat up the metal you will be soldering onto with the soldering iron and just touch the solder to it to melt onto it. Another way is to touch the solder directly to the soldering iron, which is much faster but a little harder. If you look closely in this demonstration, you can see that surface tension causes the solder to gather in a cone shape at the base of wherever you're soldering, so it's very unlikely that you will accidentally connect two pieces of metal that shouldn't be connected.


If, however, you do accidentally solder something you shouldn't have, simply touch the solder with the soldering iron. It should melt again and stick to the soldering iron because of surface tension. Repeat this until it's all gone.

Now,for the actual tutorial:

1: 8 pin stackable headers:

In the bag of stackable headers you should have, take out the two longest ones. They should each be 8 pins long. Stick them through where you see the number 1 on the first picture so that the black parts are on the top and the pins are sticking through to the other side. Go to the back of the shield and solder them in there using the tips above.

2: 6 pin stackable headers:

There should be two more stackable headers that are 6 pins long each. Do the same with those, but on the other side, at the number 2 in the picture at the top.

3: Last stackable header:

take the last header. This one is going through the other direction, through the bottom so the black section is on the other side than those of the other headers. I made the mistake of soldering this on last, which makes it really hard as there's not much room once everything else is on. That's why I recommend doing it now.

4: Breakout pins:

Take out these things and break out three segments of 10 pins each. While you're at it, for later, break out one more that's 8, another that's 7, and finally, two that are 6. Now, take the three 10 long segments and put them where you see the number 4 in the picture. The black section should be on the top and the shorter side of the pins should be pointing downwards. Solder these in from the other side. Make sure they're completely pressed into place.

5: Accelerometer:

The accelerometer is the longest sensor. Take it out as well as the pins you broke out that are 8 long. Put the short side of the pins through the bottom of the accelerometer so the circuitry is facing up. Put the long side of the pins through the top of the shield so that the accelerometer is on top. Look at the first picture at 5 for reference. Solder both the bottom of the shield and the top of the accelerometer. Try to keep it as level as possible so that the readings of the quadcopter aren't thrown off.

6: Gyroscope:

The gyroscope is the simpler looking of the last two sensors. Take it and the 7-long pins and do the same as with the accelerometer, taking care to keep it level as you solder it.

7: Last Sensor:

This is the sensor that came with the shield. I don't know what it does, just that it's necessary. Take out the two sets of pins that are 6 long each and put them on both sides of the sensor. Solder it as you see in the first picture and you're done for sensors.

8: Resistor:

Your shield should have come with two resistors. These are the little light brown things with wires coming from both ends. Take the one with the gold, red, green, and purple stripes. stick it through the two holes you see in the picture directly under the arrow coming from the "x". It doesn't matter which way it's flipped. It works the same either way. I find the easiest way to solder these (as well as the LEDs later on) is to stick the wires through and pull them from the bottom in opposite directions so the wires are pointing outwards and holding the top section in place. Afterwards, solder like normal, and break off the extra wires by either using a cutter or bending them back and forth until the break like a paperclip.

9: Resistor 2:

Do the same thing with the second resistor. This one should have gold, orange, green, and brown stripes. Solder it directly under the previous one as in the picture the same way as before.

10: Green LED:

This is simple. Take out the green LED, and solder it in the corner where you see the circle with the flat side. Make sure the flat side of the LED and the flat side of the outline match up. Otherwise, the polarity is messed up and the LED won't work. Solder it in the same way you did with the resistors.

11: Red LED:

This is the same as the green LED. Just solder it in next to it by the next outline. Once again, be sure to match up the flat sides.

Thank you for reading this, and I hope it helped.

Wednesday, June 8, 2011

Update

And two weeks later... another post that no one but me will read! I swear, talking to yourself is so much fun. If you're not me and you're bored, you should try it. So far, I haven't done anything with the quadrocopter. I need to solder some things to the Arduino, but I don't have small enough solder, so I'll do that later. Procrastination! The HobbyKing stuff hasn't come either, so I checked the package tracking thingy today on the USPS website, and it's apparently in New York going through customs and taking forever, which should be expected, because there are obviously several WMDs included with the items I bought... I hope any feds reading this know what sarcasm is because I really want that package ASAP.

A couch surfer came to our house the other day. It was pretty awesome, because we haven't had one over in a while. He was cool, and he got me into disc golf, which I'm trying to learn. I now have about ten things I want to get good at before I'm out of the house. So that's the update, and I need to go because I have stuff to do.

Monday, May 30, 2011

Arduino

So I finally messed with the Arduino yesterday. I never thought to write here until now. I found a USB cord of the right kind and plugged it into a computer. What happened next was frustrating. I needed to get the Windows device manager to work with it with the right things (I honestly don't know any of those terms. Something about ports). So I was trying to get it to work, but I was working with... Windows. The guy who showed me before had Linux, so it took him like two seconds. I had to go to Control Panel to the device manager to something else to find something and finally to click on that and select the right stuff from the application for Arduino. So, yeah. As soon as I can, I'm installing Ubuntu.

After I got the Arduino to work, I tested a simple application already written for it. It blinked an LED on it for one second at a time. It seemed to be written in Java, but apparently Arduino has its own language. We messed with the blink program since I knew the Java syntax from robotics. We got it to blink in different orders, but that kind of fun only lasts so long. Now I need to attach the shield and sensors and stuff so I can continue working on the quadcopter. Speaking of that, I got an email from HobbyKing that they finally shipped the parts and should be arriving in a few days ('a few days' is just my interpretation) which I'm looking forward to.

Sunday, May 22, 2011

My Weekend

So I didn't really test out the Arduino this weekend (yet) because of other things. Yesterday, I went to a gymnasium (for gymnastics) for the first time ever, and it was awesome. I'd never been on a springfloor before, and I spent most of my time there. I couldn't do any flips, even with the extra height, because I still need to work on my technique. I did practice vaults, and was surprised. There were some big blocks we set up probably four and a half feet high, and I could kong and dash vault over them, which was very surprising to me because they were both high and long. I could also dive roll over them which surprised me even more because I thought I sucked at those. Afterwards, I went to the foam pit to attempt learning the psychological part of a backflip, and I did after falling backwards over and over. Now I just need to work on the technique. I was so close before I left, and hope to get it next time. There's another open gym next week, but I can't go because of something I'm doing with my robotics team. I'll go the Saturday after, though. When I came back from that, I went to my friends house for his birthday party. We just sat around watching other people play Black Ops, the most overrated game ever. I did learn, however, how to jump over my leg, which was cool. Today, I'm going to study and do my homework, and after finishing that, spend whatever time I have messing with the Arduino and experimenting with a cool music program demo for FL Studio.

Tuesday, May 17, 2011

AeroQuad Stuff

So today, while I was taking a nap, a package arrived with the stuff I ordered from AeroQuad for my quadrocopter. I took a bunch of pictures of all the stuff and I'll explain it. I couldn't experiment with it today because it's late and I haven't finished studying for my Spanish test tomorrow. I plan on weighing everything, working on the Arduno, and balancing the propellers later on this week.


So in the picture above, you can see the view of everything that came. Everything is sealed in its original packaging except the accelerometer, gyroscope, and Ardunio. The second picture (to the right), is just the receipt showing everything that was delivered.

The thing I'm most excited about is the Arduino. This will basically be the brain of the quadrocopter, evaluating everything the transmitter sends and determining outputs for each motor. It came in a nice little box with a bunch of stickers and a little booklet that I probably won't read. The Arduino is probably the coolest item I'll ever see with "Made in Italy" written on it.


So this is the cool box the Arduino came in. It's blue... with words on it.


Here's the box opened. The Arduino is in the center, the information booklet is on the left, and most importantly, the stickers are on the right.


This is the Arduino up close. It's sideways. I'm not sure if it being sideways will be a major problem when putting together my quadrotor; let's hope not.


The next most important thing that came was the shield, to the left. It's not very clear because it's in a bag, but basically, you just put it on top of the Arduino. It's specifically designed both for the quadrocopter and the Arduino so you can easily solder the sensors and other things where they belong.


Another unclear picture. These are the stackable female headers. They simply connect the AeroQuad shield to the Arduino.


These are the straight breakout pins. You can break them apart to have any number connected. You solder them to the sensors and to the shield to easily connect the two together.


These are also very important. The gyroscope (top) measures rotational movement on all three planes. This is necessary so the Arduino can tell how much the quadrotor is tilted and adjust for that. The accelerometer (bottom) measures linear movement on all three planes. It can sense the acceleration of the quadrocopter so it can stay in the same general area in the air. Both give six degrees of freedom and are necessary for stable flight.


This is a servo extension cable. I got seven of them. What they do is connect the radio receiver channels, which are connected to the antenna, to the Arduino. Now the Arduino can evaluate the signals transmitted to the quadrocopter.


The last things that came were the propellers. I ordered four extras, just because according to everyone who's worked on these before, the propellers will be the first things to break. Two of the propellers are normal and two are "pusher" propellers, which are basically reversed and meant to be rotated in the other direction. They simply cancel each other out so the quadrocopter doesn't rotate. I also read that propellers are rarely ever balanced when they arrive, so I need to fix that for each one. If a propeller is unbalanced, it stresses one side of the motor more making it less efficient and decreasing its life. You can imagine what a one-bladed propeller would do to a motor. It's the same thing, but with a reduced effect.

So... that's everything. I plan on keeping updates on this project so you can follow it. Thank you for reading my blog... I just noticed how funny 'blog' sounds. I wonder who made that word up. Anyway, I have to get ready for bed and study for Spanish.

Saturday, May 14, 2011

Code Camp

Today, I did something cool. I went to Charlotte Code Camp. It was pretty amazing. If it seems like I'm typing in a monotone... tone, it's because I'm tired. Code Camp really was awesome. We (my father and I) didn't really 'formally' sign up, because I went to the site too late, but we went anyway because a fraction of the people expected don't show up to events like these.

When we arrived, we got a schedule and several pieces of paper with the sponsors on them, which was completely interesting and definitely not a waste of ink and paper. So, I chose an event to go to, on XNA particle systems, which is basically programming things like snow, clouds of dust, and fire. I want to look into XNA because I'm really looking into game/app development as at least a hobby. It wasn't really as much of a tutorial as I would have hoped, but it gave me ideas about what I could do in the future. I also won a free textbook on C++ or C# or something like that, which I'm definitely reading later. At the same time, my dad was in a class on making Windows Phone 7 apps, which I want to look into as well. He got another textbook from that on how to make Windows Phone 7 apps, to be redundant.

Afterwards, we both went to a lecture on Netduino, a microcontroller like Arduino, but with more memory and arguably much better for the same price. The guy who gave it was pretty cool. He made a water jet by his pool powered by the Netduino. He could tap places on the pool from his phone for the water jet to squirt. He showed us a basic program made to blink an LED on and off, which I just learned how to do with the Arduino last Sunday. That code was shorter than the code for the Netduino, although they were both simple.

When that lecture was over, we went to lunch. They gave it to us for free. I'm sure you're interested in what I had. I had some macaroni and cheese, if I remember. I also had garlic bread and salad. They tasted like garlic bread and salad, respectively. They provided free soda, chips, and junk food. I got lots of each. If you read that paragraph, I can tell you two things: first, you are at least semi-literate, and, second, you probably have no life, like me, which is perfectly legitimate to some people, including, but not limited to, me.

After lunch, I went to a lab. It was about a tool called Microsoft LightSwitch. I made an application that basically took information about authors in a form-like way. It allowed you to pair them up with one or more books. Although it's nothing I would use normally, it was still interesting to learn and may serve a purpose some other time.

The last thing I went to was a lecture and demo on mobile sites. I learned several interesting things from that. First, Windows Phone 7 doesn't support touch in its browser, so you can't click on things with your finger normally. That eliminates any chance that I'm going to get one. I also learned that websites with mobile versions get bumped up in a Google or Bing search, which is cool because it makes more people want to create mobile sites. That was cool, and I just want any website developers (maybe me in the future) to know that they need to make more mobile sites, because barely any normal sites are user-friendly.

There was another section, but none of the classes during it interested me, so I sat in the car reading video game stuff on my phone and looking through the textbooks we got. I went back in, and they had a raffle for stuff. The first person to win got an Xbox with a Kinect, but there were two envelopes with keys to $2000 windows software he could have also chosen, but didn't. I can't say I would do differently, though, because I don't know enough about the software to be trusted with it. Overall, it was awesome, and I'm hoping to go next year.